Wednesday, December 19, 2007

Christmas card designs 3 and 4 for Christmas 2007

Design 3. I wanted non-Christmassy colours and a simple yet elegant design. Stamped Christmas stamp using copper ink and ripped along the bottom edge. Then layered it onto silver card and ripped along the bottom edge, leaving a .5cm boarder around the other three sides. Attached patterened paper to dark base card, threaded charm using silver thread and sellotaped to back of silver card. Used double sided tape to attach silver card, ensuring that it lay mostly on the patterned paper but also on the base stock card.


This was my totally un-Christmassy Christmas card design 4. Using white ink and a stampin! up stamp, I stamped onto the base card. Re-inked the stamp and stamped onto striped card then using double sided tape, matched it up and layered the striped card onto the base card. Cut two lengths of white ribbon then threaded them through copper embellishments to add some three-dimensionality to the card. Sellotaped the white ribbon ends on the inside of the card and lined it to hide my workmanship.


So I'm curious, of the four designs I chose this year, which do you like the most?

Monday, December 17, 2007

Mittens

My first ever pair of mittens. This was a stupid pattern but I corrected the errors and here they are, complete with pom-poms. I actually finished the mittens a long time ago but only did the pompoms on the cord tonight. They do look rather strange with bare arms but I doubt any bare skin will be on show during winter in Northern China lol.


Wednesday, December 5, 2007

Tara Adams and stampin! up card making class...

Tonight Tara came over and taught us how to make cards. We got to choose which designs we liked. Most of the group made the blue snowing peace card and another red joy card, however I made five of the blue cards then went to something more adventurous.

I wont go into how we made them as that's Tara's design, but here are the cards we made...

5 of these blue ones:


And the whole reason I went, to learn the criss-cross card. It's not perfect coz it's my first attempt but it's cute enough!


And this is the insert in it where you write your message.


Design 2 xmas 07


Wednesday, November 28, 2007

Christmas card

This is one of my standard four card designs for Christmas 2007.


1. Fold green base card
2. Cut striped paper and use double sided tape to adhere to crimson red card.
3. Place patterned card on green card and poke four corner holes and attach metalic brads on the edges. Be sure that you dont poke holes through the back of the card too.
4. Stamp Christmas stamp onto white/cream card stock. Trim closely then use corner punch to round two right hand sides.
5. Attach swirl embellishment to white stamped paper
6. loop matching wool/yarn onto patterned card and sellotape in place
7. mount cream card onto patterned paper

Tuesday, November 27, 2007

The importance of backstitch lol...

Finished my sheep bookmark! Now I can read with a bit of a flavour of home beside me. :o)


Monday, November 26, 2007

Baby gifts

Because her name was too long to fit on a baby bib...


Little Ari's bib. The lettering is massive, took me ages to do this bib!


Thursday, November 22, 2007

Knitted beanies

These were knitted from Paton's 7010 pattern leaflet. It takes two balls of wool per beanie and costs under $10 each. I started the blue beanie on the weekend and completed it easily by Wednesday (having previously made myself the pinky coloured one).


Us wearing our beanies (horrible photo but you get the idea!):
Forcing our dog to try the beanie on, while bribing him with breadsticks.

Tuesday, October 23, 2007

baby cards

Baby card for a friend having a 'surprise' hence not pink or blue card. Stuck organza ribbon onto card. Stamped baby image and pitter patter stamp onto lighter orange card. Layered it onto a metalic card (for the baby picture, I crimped the metalic card but not for the pitter patter). Used paper brads to attach over the top of the ribbon.


Using ink and watercolour paper, I dyed a sheet of cardboard then punched 8 flowers. Using sellotape, attached mesh and green ribbon. Got pre-bought baby related words and stuck them to white card with brads, and trimmed the white card close. Attached that to the ribbon, then used double sided tape to attach the flowers (slightly under the mesh).


Tuesday, October 16, 2007

Shimmer card

I call this card my shimmer card because everything but the purple base card shimmers in the light.

  1. I started with purple base card cut to shape.
  2. With my new ink and an old stamp, I stamped onto shimmer white cardboard (left over from my wedding invitations-it shimmers purple).
  3. I used double sided tape to stick this onto leftover purple base card (I dont buy my card already cut to shape).
  4. TIP: When you are layering card, I reccomend you stick the stamped image onto the next layer down and THEN trim that layer, that way if you put it on crooked you can just trim it straight again. If you've cut it to shape then tried to stick the top layer on, a bit of a crooked stuff up and you have to start again.
  5. I then put the two top layers (flower stamp and purple layer) onto more of the white shimmer card and cut it close on three edges and left a wider edge on the right side of it.
  6. On that leftover area, I attached a shimmer 'ribbon' and attached it with four paper brads (also left over from my wedding).
  7. Finally I mounted all that onto my original purple card stock.

Card stock-purple
White card-shimmers purple
Stamp ink-purple and shimmers copper
Ribbon-purple and shimmers copper

Now what to do with the almost 20 cards I have sitting unused in my drawer!?

Thursday, October 11, 2007

60th birthday

This card is for my mother-in-law's 60th birthday next week. I used a big paisley stamp and white ink to stamp the purple base card. On the left over purple card, I stamped the message using the same white ink (thinking that saying might be more tactful than a big 60 written on the front). I then layered that onto white card, attached a metallic heart with a white brad. I cut four pieces of white ribbon and attached them with sellotape, then used double sided tape to attach the message over the ribbon (being sure to hide the sellotape.


Totally loving this card! Wish the photo was better lol.

Wednesday, October 10, 2007

Background stamp is paisley inked with white ink and stamped layered onto pink card. Happy birthday using white ink, stamped onto lighter pink card then layered onto darker pink card. White ribbon sellotaped to back of dark pink card, flower embellishment added to front using a paper brad going through the centre of the flower, ribbon and card. Then all that layered onto white card and attached to the base card using raised up double sided foam.


I ripped the edge of a paisley paper, layered it onto red base card using orange brads and double sided tape.Next I added red card, then stamped a flower onto some orangey paper. It was stamped three times without re-inking for a triple flower effect. Poked a hole and added embellishment 'leaf' and using matching paper and ink, I stamped a 'love' stamp and cut it to shape, attached it with double sided tape and stuck the rectangle embellishment over the top, attaching it with brads.


Wednesday, October 3, 2007

Two of my more recent efforts...

This was me trying to find a use for my very pretty new flower stamp. I stamped it onto the white card. The next step was to layer it with something to give definition to the area so I found a piece of pink and green paper. Once I'de decided what colour paper, I found the green paper brads and put them through the centres of the flower to give some 3-d effect. Then I used double sided tape to stick this onto white base card. Next I attached green and pink matching ribbon (using normal sellotape). I got some spare white card and stamped it in matching ink to the flowers, layered it on more of the pink and green paper and attached it off centre to the ribbon. A slightly unusual baby card, but I like it!


I made this card tonight. First I folded the base card and tore down the front edge. Using white card, I stamped a flower stamp with an ink pad that has three colours in it. Each was stamped slightly off to the side to leave room for the paper brads (two to the right edge, one to the left edge). Once the brads were on, I turned one to the opposite of the outter two white cards and used double sided tape to attach them to the sky blue paper. Using the same ink and stamp, I stamped the base card (note that this may appear a different colour despite the same ink used) making sure that every second stamp stamped over the edge of the paper edge. To make sure that the flowers dont stamp onto the inside of the card, slip a sheet of printer paper in the middle of the card to catch the overstamp area. Finally I stuck the sky blue rectangle onto the base card.


Sunday, September 23, 2007

My aim with this was to find a cheap, easy and quick way to make Christmas cards this year. While I like that stamp, this card doesnt look like enough effort went into it, so I wont be using it for bulk manufacture (but someone will be given it). It is a card folded in half normally, then I cut off 3cm on the edge of the top layer. Stamped the Christmas tree stamp on the front, and attached brads to the overhang flap.


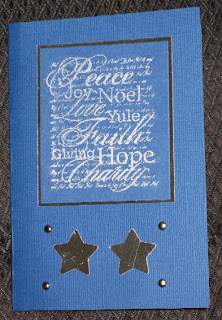
This card is actually prettier than the photo shows, as the stamp and cardboard are metallic silver (with an almost navy background-the flash has made it look lighter). Using metallic silver ink, I stamped onto blue card and let it dry. Then layered that onto metallic silver card and mounted it on the main card. Then I attached four silver brads, punched two stars out of left over silver card. Ran them through my xyron create-a-sticker machine (which adds sticky onto the back of any small paper items) and attached them between the brads.


I quite like this card. I'm thinking maybe it needs something on the right hand side but I am not sure what or whether I'll do that. This was a normal card, layered with a patterned paper. Next two strips of suede leather were sellotaped the entire way around the front and back of the card. Onto that, a strip of cardboard that I put through a crimping tool (available at kmart). I stamped the three tags, layered them onto some green card, then attached them with paper brads to the corrugated card. Then attached the corrugated card to the main card.


This was a card I made coz I like mesh cards atm lol. It's basically folded card with mesh held on with brads in the corner (the mesh is also caught on the back side of the card to keep it in place). Then a stamp onto a lighter card, layered onto a darker card and attached to the mesh with double sided tape.


Saturday, September 22, 2007

The card that started me off...


Handcrafts

Hi!

This journal is to showcase some of my crafts. I like to knit, crochet and make cards mostly but dabble occasionally in other crafts. Mostly I will upload photos of my work and explain what is on it and how it is made.

Heather